What's The Problem
This month we're building on last month's post and discussing one approach to managing IAM users across multiple accounts. More specifically we're avoiding the quick, dirty and lazy way of just throwing IAM users into each account. When you do, you quickly end up with an unmanageable jungle of profiles and access keys, which creates an increased exposure to compromised accounts. So here is a better way; read on fair explorers while we cut a path through this jungle to IAM user nirvana.
It is worth explicitly calling out that the ideas discussed below are more targeted towards smaller AWS installations. Reach out to us to discuss alternatives if you are working in a large corporate environment with a dedicated user directory and tens or hundreds of AWS Accounts.
What Technologies Are We Going To Use
This month is all about IAM; specifically, how to create a single IAM user in your root account and then use cross-account roles to perform developer actions in your child accounts.
What Are The Prerequisites
Ideally, you'll have two accounts to try this in, however a single account with two pipelines should work fine. The advantage of using two accounts is being able to clearly see the permission separation in action.
How It All Works
This post demonstrates a working example of how you can manage developer access to your child accounts. In the real world you would also have a 'break-glass-in-case-of-emergency' admin role. For this role the exact same pattern can be applied; just copy-and-paste, change the names and adjust the policies to suit. I'll leave that as an exercise for the reader.
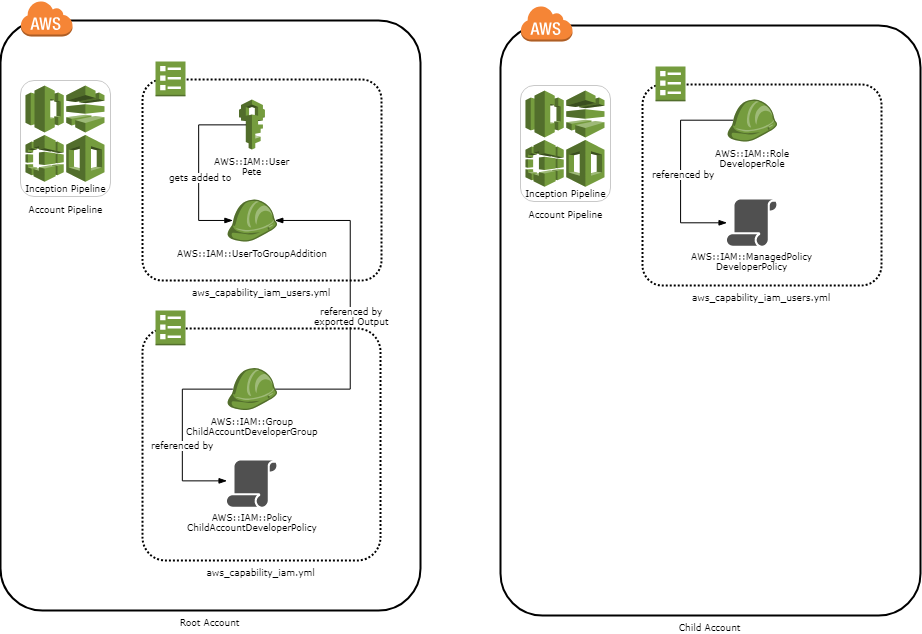
The diagram below shows how a developer role, a developer group and a developer user all hang together. It's worth calling out that I've separated out the IAM Policy from the Role/Group. My reasons for this are:
- Keep the concerns of each separate (what the permissions are vs who has them)
- Allows reuse of the policies if desired.
- Policies can be reused internally without the cross-account assumption clause being included.

Child Account
The child account has ownership what developers can do inside of it, which is does by defining IAM roles that can be assumed by the root account. In the file child/aws_capability_iam.yml it does this by defining an AssumeRolePolicyDocument like so:
  DeveloperRole:
    Type: 'AWS::IAM::Role'
    Properties:
      AssumeRolePolicyDocument:
        Version: '2012-10-17'
        Statement:
          - Action: ['sts:AssumeRole']
            Effect: 'Allow'
            Principal:
              AWS:
                - !Sub 'arn:aws:iam::${ParamRootAccount}:root'
                - !Sub 'arn:aws:iam::${AWS::AccountId}:root'
      RoleName: !Ref DeveloperRoleName
In the same file is the DeveloperPolicy policy document which outlines what the DeveloperRole can do. In the example code, the developer can manage the Inception Pipeline, view logs, read from S3 buckets and that's about it.
Root Account
The root account is the central location for managing IAM users and what they have access to. The file root/aws_capability_iam.yml defines an IAM Group (with matching IAM Policy) that can assume the DeveloperRole in the child account. Depending on your use case (number of accounts, developers, etc) you could just define a single group that has access to all your child accounts or define a Group-per-Account. It's up to you.
  ChildDeveloperGroup:
    Type: 'AWS::IAM::Group'
    Properties:
      GroupName: ChildDeveloperGroup

  ChildDeveloperPolicy:
    Type: 'AWS::IAM::Policy'
    Properties:
      PolicyName: ChildDeveloperPolicy
      Groups:
        - !Ref ChildDeveloperGroup
      PolicyDocument:
        Statement:
          - Action: sts:AssumeRole
            Effect: Allow
            Resource: !Sub 'arn:aws:iam::${ParamChildAccount}:role/${ParamChildAccountRoleName}'
The final file is root/aws_capability_iam_users.yml. In this file you create your IAM User and then assign them to the group(s) that they need access to. If the developer leaves the company, simply delete the IAM User and any group assignments and redeploy. Within a minute they will no longer have any access. Alternatively, if it's a temporary change such as long service leave, you can just remove them from the group(s) and re-add them on return.
  DeveloperPete:
    Type: "AWS::IAM::User"
    Properties:
      LoginProfile:
        Password: Dummy12321ymmuD
        PasswordResetRequired: true
      UserName: Pete

  AddUsersToChildDeveloperGroup:
    Type: AWS::IAM::UserToGroupAddition
    Properties:
      GroupName: !ImportValue 'RootAccountCapabilityIamChildDeveloperGroupName'
      Users:
        - !Ref DeveloperPete
Credentials and Config
The last missing piece is how do you use the cross-account role.
First step is to put your access/secret key into the ~/.aws/credentials file like so:
[pete]
aws_access_key_id = ABCDEFGHIJKLMNOPQRST
aws_secret_access_key = abcdefghijklmnopqrstuvwxyz1234567890aaaa
Followed by this little snippet in the ~/.aws/config file. You can see how it refers to the source credentials and links to the role to assume in the child account:
[profile childdeveloper]
region         = ap-southeast-2
source_profile = pete
role_arn       = arn:aws:iam::222233334444:role/DeveloperRole
If you had multiple roles, then copy-and-paste the above and give it another name.
Where Do I Get The Seed Files
Two complete, working pipelines are available here on GitHub with one pipeline for your root account and one for your child account. As discussed in the last post, these would be considered account-level pipelines.
What Are The Files
| File | Description |
|---|---|
| child/aws_capability_iam.yml | Defines the DeveloperPolicy and DeveloperRole. DeveloperRole is the role that is assumed by your developers from the root account. |
| root/aws_capability_iam.yml | Defines the ChildDeveloperPolicy and ChildDeveloperGroup. |
| root/aws_capability_iam_users.yml | Defines the IAM User (in this case DeveloperPete) and assigns them to the ChildDeveloperGroup |
Taking It For A Spin
If you're new to Inception Pipelines, head on over to the original post and set yourself up a pipeline. If not, copy over the files referenced above, add in the appropriate pipeline action and commit. Enjoy!
Wrapping Up
And so, another month, another awesome Inception Pipeline post. I hope you now have a clear path forward and can see how easy it is to both improve the security of your accounts and make it easier to manage them.