Part 1 discusses Seeding your Account with an Inception Pipeline - A practical example for DevOps on AWS
What's The Problem
As we all know, we are supposed to automate everything today. Everything must be 'as code' and there are no manual steps to doing anything. However when pressed with project deadlines, production fires and the rare moments when we get to work on something new, we just don't get around to it.
While working on a recent project, building out a continuous deployment pipeline, I got to thinking about the number of upcoming future projects. Each project would need at least one pipeline per application, and a dedicated one for the AWS Account. Rolling a unique snowflake pipeline everytime just seemed evil and wasteful and wrong and totally against everything we stand for at Mechanical Rock!
So welcome to the Inception Pipeline; a CloudFormation template that plants itself inside an AWS Account and then self manages and self updates itself using nothing more than off-the-shelf AWS services.
What Technologies Are We Going To Use
What Are The Prerequisites?
- An AWS Account to create the pipeline in.
- The AWS CLI installed and configured with access credentials.
- CodeCommit git credentials configured.
While not strictly required, a passing familiarity of Bash Shell scripts, Git, JSON & YAML, and CloudFormation templates will make understanding everything easier.
How It All Works

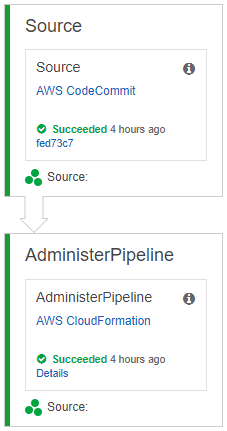
At a high-level, the Inception Pipeline works by executing a CloudFormation template which then creates a CodeCommit repository, a CodePipeline pipeline and a few other supporting resources. The first non-source action in the pipeline is a CloudFormation Deployment Action.
This blog post won't dive deeply into the CloudFormation template (I'll leave that as an exercise for you dear reader), instead I'll just discuss the really juicy bits.
The secret-sauce to the Inception Pipeline is the using the same CloudFormation stackname in the CLI/console invocation and the CodePipeline Action (CloudFormation parameter StageAdministerPipelineStackName). Once the initial CloudFormation stack has been created, the CodePipeline action below maintains the pipeline.
- Name: 'AdministerPipeline'
    Actions:
    - Name: 'AdministerPipeline'
        ActionTypeId:
            Category: 'Deploy'
            Owner: 'AWS'
            Provider: 'CloudFormation'
            Version: '1'
        Configuration:
            ActionMode: 'REPLACE_ON_FAILURE'
            Capabilities: 'CAPABILITY_NAMED_IAM'
            RoleArn: !GetAtt [CloudFormationDeployActionRole, Arn]
            StackName: !Ref StageAdministerPipelineStackName
            TemplateConfiguration: !Join ['', [!Ref RepositoryName, 'Source', '::aws_seed.json']]
            TemplatePath: !Join ['', [!Ref RepositoryName, 'Source', '::aws_seed.yml']]
        InputArtifacts:
            - Name: !Join ['', [!Ref RepositoryName, 'Source']]
        RunOrder: '1'
The CodePipeline is also configured to restart execution if it updates itself (RestartExecutionOnUpdate: true). This means when you add new stages, actions, etc, the pipeline will run the above action, realise it has changed and then restart itself.
While not strictly necessary, I would recommend that:
- The
AdministerPipelinestage is only used for theAdministerPipelineaction, i.e. don't add any other actions in. - The
AdministerPipelinestage is the first stage after theSourcestage. This allows the pipeline to update itself before anything else runs.
Where Do I Get The Seed Files
Go grab a copy from the GitHub repository.
I'll wait while you do.
What Are The Files
| File | Description |
|---|---|
| init.sh | Executing this script (assuming the prerequisites are met) will create a seed pipeline |
| aws_seed-cli-parameters.json | These are the parameters to pass to the initial CloudFormation execution. These MUST match the values in aws_seed.json |
| aws_seed.json | These are the parameters used by the CloudFormation template when executed as a deployment action in CodePipeline |
| aws_seed.yml | The pièce de résistance, the CloudFormation template that makes it all work |
Taking It For A Spin
-
Download the zip file from the GitHub repository. Do not clone the repo, as the shell script will perform a
git init. Copy the unziped files into a folder which will become your project folder. -
Open all the files into your editor-of-choice. An editor that allows global search-and-replace will be super helpful.
-
Open
aws_seed-cli-parameters.json. Perform a global replace for all values between the@@:Parameter Description RepositoryName The name of the CodeCommit repository to create CodePipelineS3BucketName The name of the S3 bucket to create that will be used to store artifacts from CodePipeline execution runs. CloudFormationDeployActionRoleName The name of the IAM role that will be created to run the CloudFormation deployment action as. CodePipelineRoleName The name of the IAM role that will be created for the CodePipeline to use. CodePipelineName The name of the CodePipeline to create. StageAdministerPipelineStackName The name of this stack that is creating the pipeline. If the names do not match then the pipeline will not be able to update itself. -
Run the
init.sh|init.batand watch the output. -
If all goes well, within a few minutes you will have a running Inception Pipeline in your account!

Wrapping Up
If you do end up running an Inception Pipeline please let me know! I'm especially keen to hear any and all improvements, suggestions and critiques.