If you're responsible for setting up AWS accounts in your organisation you might be wondering how to ensure a secure and best practice multi-account setup. AWS's threat detection service, Amazon GuardDuty, is one of the tools that you should consider including as part of that stack.
In this post we'll go over how Amazon GuardDuty can benefit you, what the new AWS Organizations feature does and how we can switch it on for accounts in bulk.
What is GuardDuty? How does it work?
GuardDuty automatically monitors resources in your AWS account for potential threats, vulnerabilities and can detect compromised resources. For example, it can detect IAM privilege escalation, unusual network traffic, compromised EC2 instances, and denial of service attacks.
A full list of finding types can be found in the user guide.
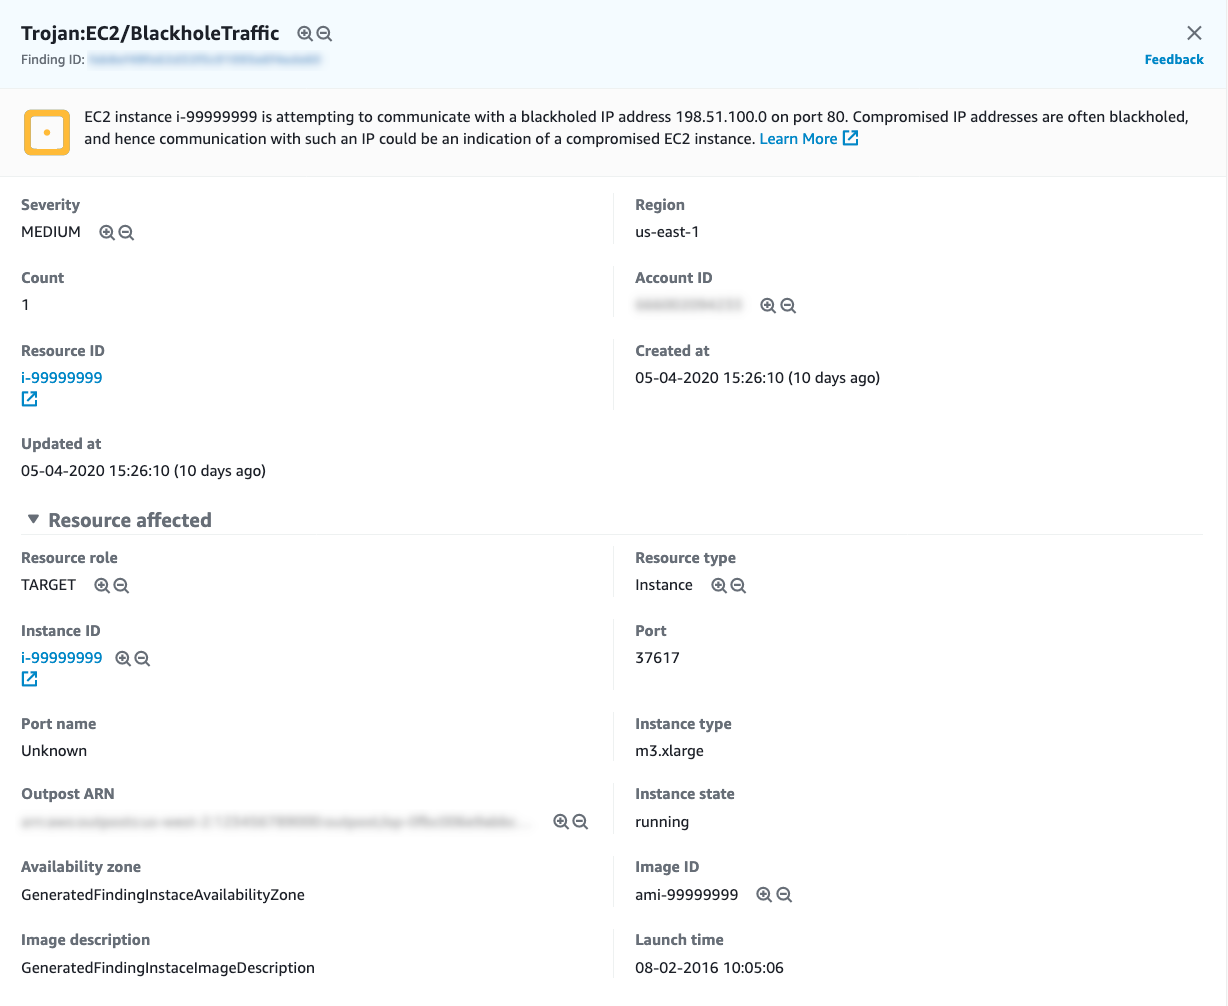
When GuardDuty discovers a potential problem, it issues a security finding. Using CloudWatch events, these findings can then be forwarded to an SNS topic to notify administrators by email, or kick off some other automated response such as a precautionary termination of an EC2 instance.
For example, this is what a finding looks like in the AWS web console (NOTE; instance IDs, image IDs and IP addresses are fake):

How can I enable it?
Before rolling out any AWS service, we highly recommend you read the pricing page and the user guide for that service to ensure that it's going to be suitable for your budget and needs. In the case of Amazon GuardDuty, we will be charged based on the number of CloudTrail events analysed and the volume of Amazon VPC Flow Log and DNS Log data.
GuardDuty is fairly easy to enable for accounts on a case-by-case basis with a single click from the web console. However, if you would like to enable it for all AWS Organizations accounts en masse and aggregate the security findings into a central account, that's when things can be trickier.
To achieve this, we can make use of the new AWS Organizations feature in GuardDuty. With this approach a GuardDuty master account needs to be elected, which gives that account permission to add other AWS Organizations accounts as members. There's also an "auto-enable" feature that automatically switches on GuardDuty for new accounts added later on.
Before this feature, invitations would need to be sent from the master account to add accounts as members. Those accounts would then need to accept those invitations. This was tricky to automate as it would require complex cross-account orchestration to coordinate the process.
So how do we actually do that?
We will write some small scripts to orchestrate the initial rollout of GuardDuty with AWS Organizations. This is a once-off activity; subsequent new AWS Organizations accounts will be automatically enabled for GuardDuty.
This would ideally be done via Infrastructure-as-Code, but unfortunately at the time of writing the CloudFormation service has not been updated to support the AWS Organizations feature.
The basic set of steps we want to run are:
Get a list of all accounts in AWS Organizations

For each region we want Amazon GuardDuty enabled:
	- Designate the GuardDuty master (via the AWS Organizations master)
	- Create GuardDuty members using account list (via the GuardDuty master)
	- Enable auto-enable (via the GuardDuty master)
We will use Typescript with NodeJS and the AWS SDK to build these scripts, as the type-safety of Typescript brings additional rigour and good testability without sacrificing flexibility.
We'll assume Typescript install and config has been taken care of, but if not here are some resources that may be of assistance:
Listing all AWS Organizations accounts
To enable GuardDuty for existing accounts, the AWS API expects that we know the IDs and email addresses of those accounts. So we'll start by retrieving them.
Let's install the AWS SDK (the stable version at the time of writing was 2.660.0):
npm i --save aws-sdk
Then import it into the script (e.g. provisionGuardDuty.ts):
import * as AWS from 'aws-sdk'
Next we want to create an AWS Organizations client, and in order to do that it's a good idea to specify the credentials.
There are multiple ways to specify the credentials to the AWS SDK. In our case, since we are running the tool from the CLI, we were happy to use the shared INI file credentials in ~/.aws/credentials, where we have profiles defined.
For example, to retrieve the credentials for the AWS Organizations master account, we can use the following (where my-organization-master-account-profile is the profile name):
new AWS.SharedIniFileCredentials({ profile: 'my-organization-master-account-profile' })
Here's a full example of creating an AWS Organizations client:
const orgs = new AWS.Organizations({,
  credentials: new AWS.SharedIniFileCredentials({ profile: 'my-organization-master-account-profile' }),
  region: primaryRegion,
})
Now that we have a client, let's call listAccounts to find all accounts:
const subAccounts = await orgs.listAccounts({ NextToken }).promise()
Note that this is a paginated endpoint, so if the returned NextToken property is not null, we should continue looping until it is to get all records.
The function below demonstrates the full paginated solution:
export const getAllAccounts = async (credentials: AWS.Credentials, region: string) => {
  const orgs = new AWS.Organizations({
    credentials,
    region,
  })
  let results: AWS.Organizations.Account[] = []

  let NextToken: string | undefined

  do {
    const subAccounts = await orgs.listAccounts({ NextToken }).promise()

    NextToken = subAccounts.NextToken
    assertDefined(subAccounts.Accounts)

    results = results.concat(subAccounts.Accounts)
  } while (NextToken)

  return results
}
It can be called like this:
const subAccounts: AWS.Organizations.Account[] = await getAllAccounts(
  new AWS.SharedIniFileCredentials({ profile: 'my-organization-master-account-profile' }),
  primaryRegion
)
Enabling the master
The steps from here on will need to be run for each region that we want to enable GuardDuty in (i.e. for (let targetRegion of regions) {..}). We'll also be running commands in multiple accounts:
- The AWS Organizations master account to elect the Amazon GuardDuty master account
- All other commands will be run in the Amazon GuardDuty master account
Let's create a GuardDuty client for the AWS Organizations master account:
const organizationsMasterGD = new AWS.GuardDuty({
  credentials: new AWS.SharedIniFileCredentials({ profile: 'my-organization-master-account-profile' }),
  region: targetRegion
})
Now that we have a GuardDuty client specific to that region and account, we can elect a GuardDuty master account with the enableOrganizationAdminAccount method:
await organizationsMasterGD
  .enableOrganizationAdminAccount({
    AdminAccountId: params.GuardDutyAdminAccountId,
  })
  .promise()
As long as that call didn't throw an error, we can assume it was successful.
An aside on account strategies
You might now be wondering why the GuardDuty master account would be a different account to the AWS Organizations master account. To understand this we need to introduce the concept of account strategies...
If you're working within an organisation with several external or internal projects and have people working in many different roles, it's likely you'll want to have some bulkheads between projects and workloads. This reduces the risk of one project accidentally clobbering or causing an outage for another project. It can also limit the blast radius of compromised systems.
In AWS this is achieved by using AWS Organizations (and other supporting services) alongside an account strategy.
An account strategy is a pre-determined approach for how you will structure and organise accounts. For example; super-cool-crm-product might run in two accounts; super-cool-crm-product-non-prod and super-cool-crm-product-prod, but super-cool-website might run in two other accounts; super-cool-website-prod and super-cool-website-nonprod.
The examples above are what we call "workload" accounts i.e. they are running production or non-production systems depended on by customers or internal to the business. Depending on your needs, you may want to create other kinds of accounts, for example:
- Security or Audit account for aggregating security findings
- Log archive account for aggregating CloudTrail and CloudWatch logs
- Build account for CI/CD pipelines
- Domain account for purchasing domain names or external DNS delegation
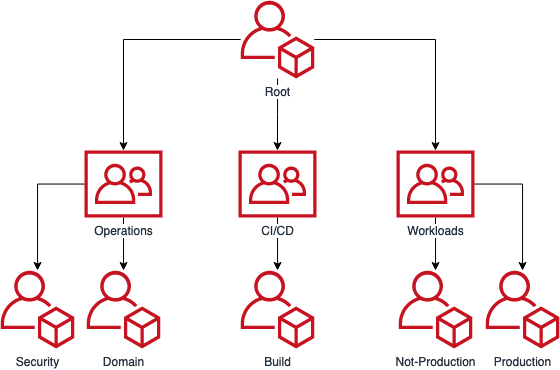
Using AWS Organizations, these accounts can be organised into Organizational Units (OUs), which further allows us to apply policies to whole groups of accounts (e.g. ensuring CodePipeline is only used in the build accounts, and not workload accounts).
For example:

For GuardDuty, we are electing the Security/Audit account as the master, as it makes sense to aggregate security findings there.
Creating members
Before we can create members, we need to get the ID of the newly created detector in the GuardDuty master account.
Let's create a new GuardDuty client for the GuardDuty master account:
const guardDutyMasterGD = new AWS.GuardDuty({
  credentials: new AWS.SharedIniFileCredentials({ profile: 'my-guardduty-master-account-profile' })
  region: targetRegion
})
We can then find the detector ID by listing all detectors in the account, and assuming that only one detector is enabled on that account (and erroring if that assumption is false):
const detectors = await guardDutyMasterGD.listDetectors().promise()

// Make some assumptions about detectors
assertDefined(detectors.DetectorIds)
assertTrue(detectors.DetectorIds.length === 1, 'Unexpectedly found additional GuardDuty detectors')

const DetectorId = detectors.DetectorIds[0]
That detector ID and the list of AWS Organization accounts can then be used to call createMembers:
await guardDutyMasterGD
    .createMembers({
      AccountDetails: subAccounts.map((account: AWS.Organizations.Account) => ({
        AccountId: account.Id || '',
        Email: account.Email || '',
      })),
      DetectorId,
    })
    .promise()
Assuming that call succeeds, GuardDuty will now be enabled for all members in that region!
Enabling auto-enable
The last step for each region is to set AutoEnable to true. This will ensure any new AWS Organization accounts will automatically have Amazon GuardDuty enabled:
await guardDutyMasterGD
    .updateOrganizationConfiguration({
      AutoEnable: true,
      DetectorId,
    })
    .promise()
Verify via the console
If we execute that script and it runs to completion, then our GuardDuty setup should be ready.
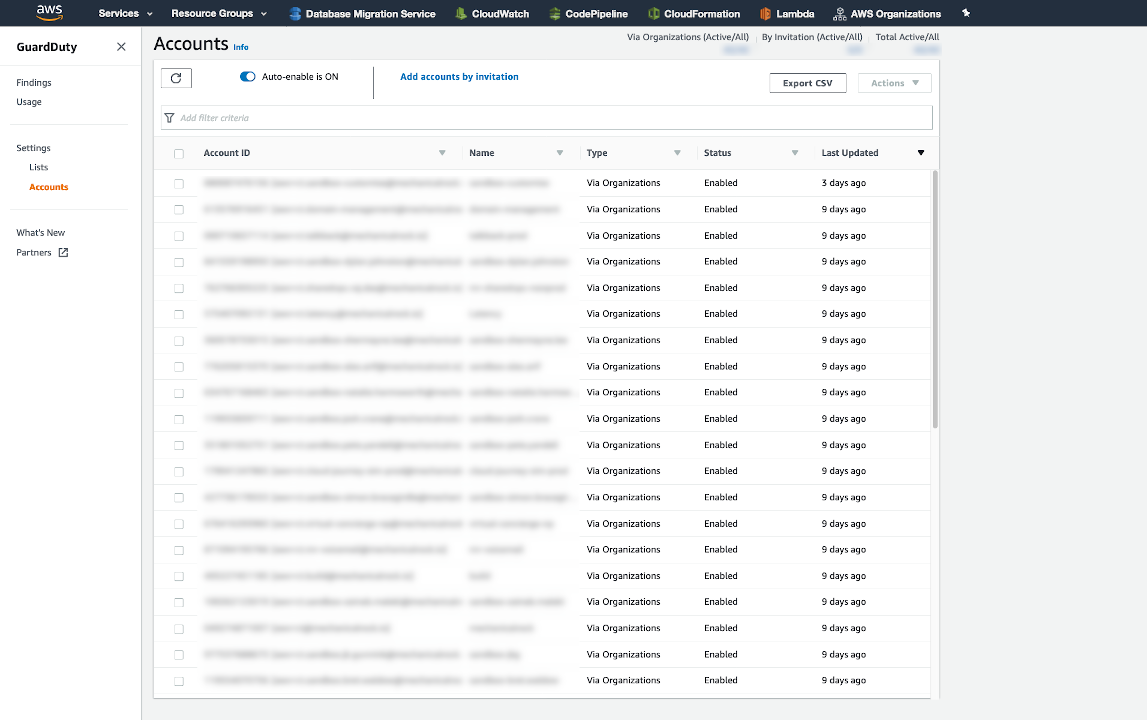
Let's open the AWS web console to verify that everything is enabled as expected. Navigate to:
- Services
- Amazon GuardDuty
- Settings
- Accounts
If everything worked, you should see all of your accounts listed on this page, with a type of "Via Organizations", and "Auto-enable" ON at the top.
Findings will then appear in the Findings tab as they are detected by GuardDuty. You can configure GuardDuty to publish findings to an SNS topic, which could then be used to forward those findings to a Slack webhook or an email subscription.

Conclusion
In this article we've demonstrated how to enable Amazon GuardDuty en masse for all of your AWS Organizations accounts with a small script. With that we've taken a small step towards increasing the security of accounts by ensuring we have detective controls in place, which is one of the best practices identified in the AWS Well Architected Framework.
If you need help or want to learn more about securing your AWS accounts, please reach out to us.