Chrome-ing to Success: Automate CI/CD for Web Extensions
Chrome-ing to Success: Automate CI/CD for Web Extensions
One of my biggest learnings when it comes to web extension development is to start with the end-to-end software lifecycle in mind. Building web extensions can be a complex process—with limited online documentation and many pitfalls from simple errors. This guide aims to eliminate most of that friction, letting you set up a complete CI/CD pipeline so you can jump straight into what matters: building your extension!
This guide will show you how to set up an end-to-end CI/CD pipeline to get your web extension up and running quickly.
Note: This blog specifically refers to Manifest V3 and targets extension development on chromium browsers (Chrome, Microsoft Edge, Opera).
Why Host an Extension Privately?
Hosting an extension privately instead of via an official Web Store lets you:
- Maintain fine control over security and access — you decide exactly who can install and update the extension.
- Retain technical ownership— you’re not subject to another company’s policies regarding extension permissions and features.
- Decouple from any one browser’s web store requirements, avoiding the potential lock-in or lengthy review processes.
1. Setup Initial Project
Begin with a basic web extension project structure in your repository provider of choice that includes:
- src
- manifest
- content scripts
- popup
- scripts
- tests
- config files
- package.json
- infrustructure
- workflows
For inspiration, Mechanical Rock's Universal Translator Extension used:
- Git & GitHub for version control
- Vue for the user interface
- Vite as a fast build tool
- TypeScript for type safety
- Jest, for testing
- WindiCSS to style the UI
- Cloudformation for IaC
- GitHub Actions to run CI/CD workflows
- NPM to manage packages
Developing for multiple browsers—Chrome, Edge, and Opera—can introduce subtle differences in APIs, background/service worker behavior, and content script execution contexts. Web Extension Polyfill smooths out these discrepancies and ensures consistent promise-based APIs no matter which browser you’re targeting.
Install via npm:
npm install webextension-polyfillContinue to watch out for browser-specific nuances. This landscape is treacherous with Gotchas.
Also consider WebExt Bridge for promise-based messaging between different extension components such as background scripts, content scripts and popups. WebExt Bridge is compatible with every major browser.
Install via npm:
npm install webext-bridge2. Create a Static Extension ID
Every web extension needs a unique, static ID. Here's how to generate and manage one:
1. Create a private key: Use OpenSSL to generate a key compliant with Chrome’s requirements:
openssl genrsa 2048 | openssl pkcs8 -topk8 -nocrypt -out key.pem2. Check the Extension ID: Run the following command to compute the extension ID from your key:
openssl rsa -in key.pem -pubout -outform DER | shasum -a 256 | head -c32 | tr 0-9a-f a-p3. Store the Private Key Securely: Keep your private key safe for later use when creating production-ready extensions. For instance, you can convert the key.pem file to base64 and store it in your secrets manager.
openssl base64 -in key.pem -out key.base644. Extract the Public Key in Base64: Compute the key that will be embedded in your manifest for local testing:
openssl rsa -in key.pem -pubout -outform DER | openssl base64 -A5. Add the Base64 Public Key to the Manifest: Embedding the public key in your extension manifest ensures the extension ID remains consistent in browsers for local testing.
Example manifest.json:
{
    "manifest_version": 3,
    "name": "Mechanical Rock Universal Translator",
    "version": "2.0.1",
    "key": "MIIBIjANBgkqhkiG9...",
    "update_url": "https://jd26a63q8lbvtle.cloudfront.net/manifest.xml",
    // and so on...
}
Now that your extension ID is secured, let’s move on to the next step.
3. Set Up Cloud Infrastructure as Code (IaC)
To make your extension accessible to browsers, host the build on cloud storage. Using AWS CloudFormation, for example, you can define:
-
S3 Buckets:
- A deployment bucket for current extension files.
- An archive bucket for older versions.
-
CloudFront Distribution:
Configure a CloudFront distribution to serve files from your deployment S3 bucket. You can use the free default URL provided by CloudFront or set up a custom domain via Route53.Finally, automate a CloudFront invalidation for both the manifest and extension file for whenever you deploy an update. This forces CloudFront to fetch the new files from S3 immediately.
-
Secrets Management:
Use AWS Secrets Manager to store your private key and other sensitive configuration details. -
IAM Roles:
Create separate roles for:- CI/CD operations: Permissions to read/write S3 buckets and manage secrets.
- Infrastructure as Code (IaC): Permissions to deploy and update AWS resources.
4. Configure the Manifest for End User Browser Updates
Your manifest file is crucial—it defines your extension’s name, version, icons, and update URL. Browsers check this file every few hours for updates. Make sure you include an update URL that points to a manifest.xml hosted in your deployment bucket.
Example manifest.xml:
<?xml version='1.0' encoding='UTF-8'?>
<gupdate xmlns='http://www.google.com/update2/response' protocol='2.0'>
    <app appid='nnececkbapebfimnaniiiajkandcbblb'>
        <updatecheck codebase='https://jd26a63q8lbvtle.cloudfront.net/extension.crx' version='1.3.1' />
    </app>
</gupdate>
5. Build a Pipeline for Releases
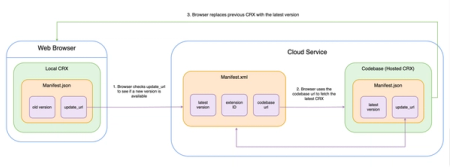
Before you start building the pipeline, it's important to understand how web extensions auto-update.
There are 3 components to this:
- Local
extension.crx- local device in browser - Hosted
manifest.xml- deployment S3 bucket - Hosted
extension.crx- deployment S3 bucket
A user's web browser checks periodically for updates by using the local extension's manifest.json which has a update_url that with a URL to the hosted manifest.xml.
It will then compare the version of the local extension.crx and the version the hosted manifest.xml contains. If there's a new version available, the browser will use the codebase_url URL in the hosted manifest.xml to download and replace the local extension.crx.
Common Pitfalls
-
Complex Auth
Chrome's automatic update mechanism cannot handle complex auth like accessing hosted extension files via signed URLs. If you still need to lock it down at an enterprise level, try restrict CloudFront to only corporate IP ranges. -
Incorrect Version
If you forget to increment the version or keep it below the installed version, the update won’t trigger. -
Broken URLs from File Name Changes
If theupdate_urlorcodebase_urlreferences a URL path that isn’t kept consistent or contains illegal URL characters, auto-updates fail. -
Mismatched Keys or Manifests
If the key or extension ID doesn’t match across environments, auto-updates can silently fail. -
Missing HTTPS
Most browsers require HTTPS for update URLs—non-HTTPS endpoints generally block auto-updates.
Before automating your release process, take time to understand the workflow:
-
Trigger a Release:
Developers mark a release (major, minor, patch) for a target environment (dev, UAT, prod). -
Assume the CI/CD IAM Role:
Securely obtain the role with the necessary permissions. -
Retrieve and Decode the Private Key:
Pull the base64 key from AWS Secrets Manager and convert it back to a PEM file. -
Bump Semantic Version:
Bump the version inpackage.jsonbased on the marked release. -
Update the Manifest:
Inject both the new semantic version and correct update URL into the manifest file that links to themanifest.xmlhosted in your S3 deployment bucket. Also inject the bumped semantic version. -
Run the Build Process:
Generate build artifacts, creating an extension folder. -
Generate a manifest XML:
This file should include the extension ID, the URL of the generatedextension.crxfile in your S3 deployment bucket, and the new semantic version. -
Sign the Extension:
Use the private key to create the signedextension.crxfile:google-chrome --pack-extension="your-extension-folder" --pack-extension-key="your-private-key-pem-file" --no-message-boxThis same private key must be used each time you deploy a new release.
-
Upload Artifacts:
Upload the signedextension.crxunder the MIME typeapplication/x-chrome-extensionandmanifest.xmlto both the deployment and archive S3 buckets. In the deployment bucket, the file names must always be the same else the URLs will change and the references in the system will be broken. In the archive bucket, this matters a lot less and the files need only be organised across version folders.
6. Deploy on Windows Device with Registry Editor
-
Fire Up Registry Editor
- Press Win + R, type
regedit, then hit Enter. - Proceed past any User Account Control prompts.
- Press Win + R, type
-
Go to the Correct Key
- For Microsoft Edge, navigate to:
HKEY_LOCAL_MACHINE\SOFTWARE\Policies\Microsoft\Edge - For Chrome, use:
HKEY_LOCAL_MACHINE\SOFTWARE\Policies\Google\Chrome - Other Chromium-based browsers will have similar paths.
- For Microsoft Edge, navigate to:
-
Allowlist Your Extension
- Inside the appropriate key, look for or create
ExtensionInstallAllowlist. - Add a String Value with a Value Data set to your extension ID.
- Inside the appropriate key, look for or create
-
Add the Extension’s Source
- Next, look for or create
ExtensionInstallSources. - Add a String Value containing the
update_urlto your extension’smanifest.xml. If you are using the default CloudFront URL, it will be in this format:https://jd26a63q8lbvtle.cloudfront.net/manifest.xml
- Next, look for or create
-
Head Over to Your Browser
In Edge or Chrome, click Extensions → Manage Extensions → Update. The browser should then fetch and install the extension from your hosted location—no manual downloads required. -
Optional Group Policy Rollouts
- To push this extension to multiple devices, replicate these registry settings in your organisation’s Group Policy.
- Once the policy is deployed, any managed devices automatically receive (and update) the extension after several hours and a browser restart.
Removing the Extension
If you need to remove the extension later, follow these steps:
- In Manage Extensions, click Remove next to the extension.
- Open Registry Editor again and delete any corresponding values in
ExtensionInstallAllowlistandExtensionInstallSources. - Restart the browser to fully finalise the removal.
Using the Windows Registry in this manner gives you a direct, private deployment path—especially handy for internal testing, enterprise environments, or any scenario where you want tight control over who installs your extension and when.
7. Add More CI/CD Workflows
To ensure a robust development process, it's essential to implement three more distinct workflows that manage both code and infrastructure changes:
-
Automated Testing Workflow:
Triggered on all pull requests targeting your source code, this workflow runs your automated tests (unit, integration, etc.) and a test build to ensure quality and prevent regressions. -
Infrastructure Change Set Generation Workflow:
A dedicated workflow monitors pull requests that modify your infrastructure directory. When changes are detected, it automatically generates a change set and posts it as a review comment on the PR. This step enables the team to review proposed infrastructure modifications before any deployment occurs. -
Infrastructure Deployment Workflow:
Once an infrastructure PR is merged into the main branch, a separate workflow is triggered. Operating with the necessary IAM permissions, this workflow applies the approved change set to your cloud environment, ensuring that vetted changes are deployed safely.
Conclusion and Next Steps
Congrats! You’ve now seen how to set up a Manifest V3 web extension project and pair it with a full CI/CD pipeline, enabling auto-updates, secure private key handling, and reliable hosting in the cloud.
Now you can develop with peace of mind that whatever you build will be robust and production ready.
If you're still looking for more ways to build on what this guide has covered here are a few suggestions:
-
Add Manual Approval Step to CI/CD Workflows
It's good practice to require a code review and manual promotion for production deployment. -
Add Unit Testing and Integrated Testing
E2E testing is also possible; however, as of this writing, it’s limited to testing in the popup window context only. Automating interactions between the extension popup and the webpage is still not well-supported. -
Refine Security
Implement additional safeguards, such as more granular IAM permissions, to secure your IaC and private keys. You can also add WAF protection rules or CloudFront geographic restrictions to further lock down access to the extension -
Add Linting & Code Quality Checks
Ensure each pull request goes through a linter to maintain consistent code standards. For example, ESLin is useful for identifying problematic ECMAScript/JavaScript patterns and cfn-lint can validate CloudFormation. -
Implement Logging and Monitoring of AWS Resources
Add logging and monitoring solutions (e.g., AWS CloudWatch) to track usage and error rates.
Thanks for reading and happy hacking!